Can you believe it? I have made it to 100 blog posts. Alright, technically 101 since our little bundle of joy arrived before I could finish this post. In some ways, this seems like I should have hit 100 a long time ago, but in most ways, I feel like this is still such a baby blog. I am learning so much, not only through the projects about my house, but about the commitment to maintaining a blog! Wow - can any of you relate to that statement?
In honor of this post, I have decided to recap my top ten favorite projects/posts that I have written about so far. Some of them might be recent and some are from a while back, but they have all been special or fun for me. Here they are, in reverse order.
10. This really bad joke.
I forgot about it until I was perusing my own archives. And then it hit my how funny I *still* think it is. Apologies for those disappointed that this is not a home or crafting related item. But congratulations to those of you who can work this into your conversation sometime soon.
9. Finding fashion inspiration - even if it comes from an 11 year old.
8. Corking the Cabinets.
This project was inspired by my favorite folks here. And you wouldn't believe how handy it is. My mother even copied me. It helps folks that struggle with clutter (like me) to have a place that isn't really seen to stow away junk like receipts and coupons, and it is great for folks like my mother (total neat freaks) who can't stand anything left out on the counter.
7. Monogram art.
This project was so quick and so fun. I love it because I made it especially for my little guy, but it would be such a great baby shower or children's birthday gift. Hey, it could even be a cool gift for just the right adult, too.
6. Purging 100 items.
Purging 100 items really made me feel like I accomplished something. As I think now about how many baby items have recently come into our home (here's a hint - way more than 100), it reaffirms what I had been thinking at the time of my purge - that I want to make this an annual thing. For a junk hoarder like me, this was a stretch, but I am really proud that I made my goal.
5. Homemade Skirts.
I plan to make more of these as soon s I have my waist back!
4. The Scrappy Baby Quilt.
I had no pattern whatsoever and just a very loose plan. And I loved the result. I'm actually in the cutting phase to make another baby quilt, which I can't wait to do. As easy as these are to make, I'm disappointed that I've only made one this past year.
3. Upgrading the light fixture.
This is the first light fixture we upgraded in the house, and it really adds the modern spin that I'm after. Because we moved into a brand new house, there really isn't a problem with any of the other light fixtures (or fixtures in general), but changing out builder basic is so simple and so rewarding. The soon-to-be littlest Stover gets the coolest details in his room. Although budget is ultimately going to dictate the pace of this, I hope to upgrade other fixtures in the house in the future.
2. The paint chip art.
This project was completely inspired by her. It was free, since I already had the frame. And it was fun, since you can pull together ANY colors from other places in your home. I know yellow, orange, and pink aren't everyone's go to colors, but I needed another pop of bright colors like this to pull from the furniture and accessories of the living room. Plus, like the names of nail polishes, I just like reading the names of the paint chips as I walk by. I'm a dork like that.
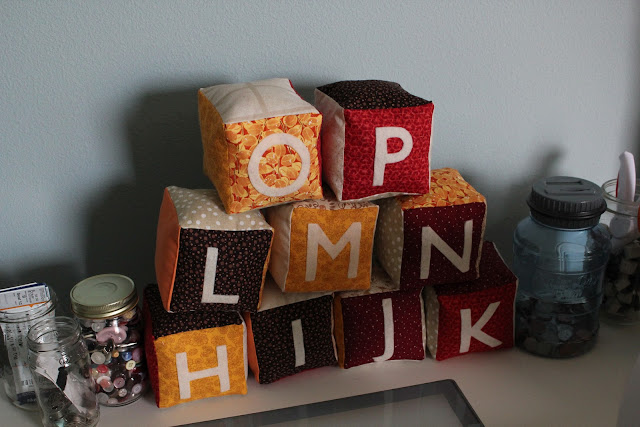
1. The alphabet blocks.
This was truly a labor of love, since it took my quite a while to actually finish them. However, this was the first project that I created and executed entirely out of my own mind, figuring things out as I went. (Although I know you can find similar projects out there on the internet, I didn't reference any of them during my process.) And on top of it, I showed you step by step exactly how to make your own. Have any of you made them? I really want to do this again for my own little one, but I haven't quite mustered up the energy yet. Soon. I'll find a way.
The honorable mention goes out to the landscaping project that we have done out in the front of our yard this year, but the reason I didn't include it is because we are still making some final adjustments. The thing that takes the most time is cutting the capstones. We are over halfway there, but, as I've said before, just bear with us - doing it the right way is time consuming.
I can't wait to see what will happen around here in the next 100 posts - small changes, big changes, only time will tell what lies ahead.
Friday, July 22, 2011
Tuesday, July 19, 2011
He's Here!
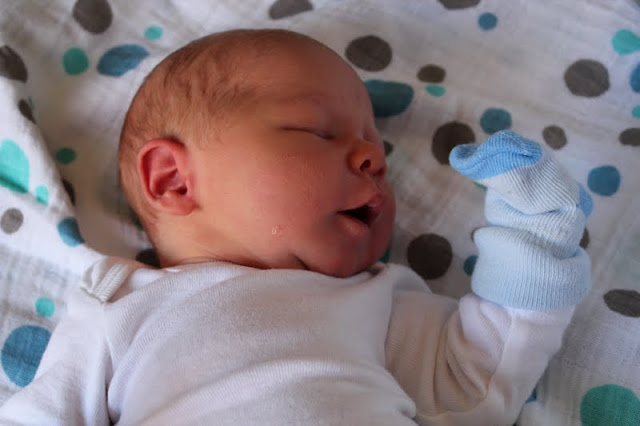
Mason Jude Stover arrived Saturday evening, July 16, at 6:08 pm. He weighed 8 lbs, 3 oz. and was 20 inches long. He came by c-section, and the words I heard all through out the operating room once he was delivered were what a big boy he is!
Ironically, this is my 100th post. I had something fun in the works, which I will still post when I get it complete, but I think this is much bigger news and much more celebratory for a 100th post. Way to go Mason - your timing is just perfect!
Wednesday, July 13, 2011
#8
I guess setting monthly reading goals really was the kick in the pants my little brain needed. As you may remember in June, a goal of 50 pages led to actual reading of 66. Well in July, and we are not quite halfway in, a goal of 50 pages led to actual reading of the rest of the book. Woo hoo!
In case you haven't referenced my 30 Before 30 list, the particular book I am referring to is called "Through Painted Deserts" by Donald Miller. I think his most famous book is called "Blue Like Jazz" in case you have heard of him. Basically, this book is about a road trip that he and a friend take from his home state of Texas, through the dessert, and up into Oregon, which is the home state of his traveling companion. I don't know why I'm so drawn to non-fiction over fiction, because often times I feel like I have a hard time really getting into non-fiction, but for some reason, it's where I go. This book, however, didn't take long for me to get into. Honestly, building my reading habit again is what made the book take so long - the book itself moved quite quickly for me.
I don't want to spill too much of what goes on, in case anyone wants to read it (which I would recommend), but I do want to share one excerpt that I found particularly interesting. It comes toward the beginning of the book.
So have any of you read this or any other Donald Miller books? Any other books you would recommend to me? I do have one other book to read on my 30 before 30 list that I'll probably try to knock out next, but I did really enjoy having another option to spend my time on, other than getting lost in the TV or internet. Maybe this will become a new habit for me!
In case you haven't referenced my 30 Before 30 list, the particular book I am referring to is called "Through Painted Deserts" by Donald Miller. I think his most famous book is called "Blue Like Jazz" in case you have heard of him. Basically, this book is about a road trip that he and a friend take from his home state of Texas, through the dessert, and up into Oregon, which is the home state of his traveling companion. I don't know why I'm so drawn to non-fiction over fiction, because often times I feel like I have a hard time really getting into non-fiction, but for some reason, it's where I go. This book, however, didn't take long for me to get into. Honestly, building my reading habit again is what made the book take so long - the book itself moved quite quickly for me.
I don't want to spill too much of what goes on, in case anyone wants to read it (which I would recommend), but I do want to share one excerpt that I found particularly interesting. It comes toward the beginning of the book.
"Recently I have come to believe there are more important questions than how questions: How do I get money, how do I get laid, how do I become happy, how do I have fun? On one of our trips to central Texas, I stood at the top of a desert hill and looked up into the endlessness of the heavens, deep into the inky blackness of the cosmos, those billion stars seeming to fall through the void from nowhere to nowhere. I stood there for twenty minutes, and as it had a few times that year, my mind fell across the question why?"
If I'm going to recommend this book, I should probably warn you that there are definite spiritual undertones as you can probably see from the excerpt above, although I didn't feel like this book was a religious lecture. The how vs. why question was an interesting one for me to think about, mostly since I do tend to be one of the "why" people. In the end, the message of this book did challenge me to rethink the way I see God in my life.So have any of you read this or any other Donald Miller books? Any other books you would recommend to me? I do have one other book to read on my 30 before 30 list that I'll probably try to knock out next, but I did really enjoy having another option to spend my time on, other than getting lost in the TV or internet. Maybe this will become a new habit for me!
Sunday, July 10, 2011
Nursery Update - Fabric, Art, and Some Finishing Touches
It's been awhile since I've updated everyone on the progress that's been happening in the nursery, and let me tell you, there has been some...finally! I was actually getting pretty stressed because I felt like we were never going to have a nursery that would actually be functional without piles and piles of stuff on the floor. Fortunately, even though things are far from finished, I am happy to report they are definitely functional and I don't have piles of random stuff on the floor. Mission accomplished!
As I mentioned, I got the curtains mostly done, sans hem. My process was really simple - cut the panels to size, which just so happened to be almost the exact same size as my dining room table, turn in three edges (top and both sides) first about a half inch, then another half inch (all eye-balled), and sew down. Yes, I used the iron on this step, but no, I didn't use pins. It worked great.
And once hung using the curtain clips I had gotten, they looked like this. (Warning - funky photo coloring ahead. I have not mastered shooting at night OR at an open window!)
The next thing that I can show you is the crib skirt I whipped up. I used the same technique that I used for the curtains, but I actually finished all the edges. I just made the skirt panels a little long, then safety pinned them to the bottom of the mattress (lazy man's solution). This way I can adjust them as I lower the mattress over time. To be honest, it is NOT my best work. It was more of a quick and dirty solution. But it will do, and I highly doubt anyone will be putting their nose up to it to inspect my workmanship. Not even my mother.
Another project that I think I have yet to share is that we attached the changing pad to the dresser and hung a shelf above. I really love the way this turned out if I can say so myself. I had originally intended to hang two shelves, but due to the height that we hung the first one, it just didn't make sense for us to hang a second. So one shelf it is.
The gold frame you see above is from Pier 1, and I picked it up for about $6 on clearance, down from $24 or so. I love it, and although for now it's just a picture of mommy & daddy, I hope to soon replace it with one of our first family photos. Say it with me now...awe.
Fortunately the lovely diaper genie is hidden if you are just peeking in the room, but yes, it is on display for all to see. Sometimes function overrules form. And I don't know what to do about the big black cord hanging down from the fan, so I think I'll just have to learn to live with it. Maybe Byron and I could figure out a way to change it out for a clear cord? Or affix it to the wall somehow so baby doesn't reach up and grab it causing the whole thing to topple over? Thankfully I have some time to ponder that one. By the way, the fan came from TJ Maxx for around $30 and I love it. I had been looking for a little fan of that size that was a little bit vintage-y looking for awhile now, totally unsuccessfully (or at least not for a decent price). TJ came to the rescue.
Finally, we got started on the gallery wall. Two items probably does not technically a gallery wall make, but it's a work in progress. I'm pretty sure you have seen these two pieces before. The first one required a little work to the frame since my heart was set on white and I could only find black. Enter glossy white spray paint. Here is the before picture.
If you are a better spray-painter than I, then maybe the spray paint instructions will work for you, but they didn't really work for me. What I mean is, the paint said that it would probably take two coats. Um, it was more like 6-7, or even more, for me. I lost count. And honestly, I probably could have done more. So maybe I'm doing something wrong? I don't know, but the frame is now white.
And here it is on the wall, with the 'M' I made a few nights ago. Love!
And that is where we are today. There is still some closet organizing to do, some drawer organizing to do, work on the gallery wall, book sleeves to make (did I mention I want to make those too? I ordered the CUTEST fabric for them. I can't wait to get started!), a mirror to find and hang, etc. But overall, the room is in pretty good shape for this little one to make his arrival. You hear that little man? Any time is fine with me!
Here are a few wider shots to put things into context.
Wednesday, July 6, 2011
Fun with Crayons
A while back, I had pinned this image on my pinterest board.
So last night, I tried it. I found a white shadowbox frame that was 10" x 10", so I started by making a stencil that was approximately 8" x 8". I had originally printed some letters out on the computer, but in the end, I just went with a really simple M shape. Hmmm...was that a hint?
I had also purchased a piece of white scrapbook paper that I used for my background. I traced the M onto the scrapbook paper and cut it to size.
I purchased two boxes of 24 crayons, but in the end I picked up a third, mostly because there are so many oranges and blues and I wanted my colors to be more varied.
Before I started gluing, I needed to figure out how I would break my crayons to size. I finally decided on using a cutting board and a knife. Maybe not the best use of my kitchen utensils, but it worked great for this project!
The last thing I did before starting was that I actually had my inspiration picture pulled up on my laptop so I could refer back to it.
Now that I had my art station set up, it was time to get started. I loosely measured how big my crayon pieces should be, cut them to size, and then used rubber cement to attach them. I used rubber cement because it was the first thing I found around the house that would work, but I'm sure there are lots of other adhesives that would work. I would be nervous about hot glue, but maybe I'm the only messy one out there that gets glue stringies everywhere. I'll show you the next parts of the process visually.
One thing I didn't do at first, and then only occasionally, was to erase my pencil marks. In the places where I used a sharp crayon head, if you look closely, you can see the pencil marks. Oh well. I don't think that most people will see this from that close up. I will also say the rubber cement takes awhile to dry, so I wouldn't move this right away. Of course, I couldn't possibly wait for that to see what it would look like in the frame, so I did jimmy the frame on without lifting up the M. Here's what that looks like.
Perfect! Now I just can't wait to get it up on the wall. I'm planning a little gallery wall, but so far I only have two pieces to hang so it will be a little sparse at first. That's okay. I love what I have so far, so I'm comfortable to just keep adding to it with items that I love as I can.
Altogether, this project was really affordable, and I highly recommend making one for yourself. The frame I found at JoAnn for 40% off, so it was about $12. The scrapbook paper was $.69, and the 3 boxes of crayons were around $1.30 each. My grand total was under $17. Woot woot. If anyone else out there takes on this project, be sure to let me know how it turns out for you!
Saturday, July 2, 2011
July Goals
A new month with new things in store. Before I look forward to the new month, though, let's check and see how I did on my June goals.
1. Take the dog (and myself) on at least 15 walks. This didn't go so well. I think I only went on 6 or 7 walks. I know this isn't a place for excuses, but I had a little trouble in this area. You see, my feet have swollen into small tree trunks. I have actual fat rolls on my cankles. By the time I get home from work, my feet are so sore and I just can't bring myself to walk a mile around the neighborhood. I have high hopes for other goals of this type as soon as the swelling is gone.
2. Hem the bedroom curtains. I did not do this. No excuse.
3. Finish the nursery curtains. Woo hoo! This snuck in at just the last minute. I have pictures and will post soon. Of course, my one little disclaimer is that they are not hemmed yet (are you surprised?). Do I smell a July goal?
4. Line the nursery dresser drawers with fun paper. Couldn't find any fun paper. Anywhere. I'll keep looking.
5. Plant at least 3 more things in the front flower bed. As I shared, I planted two. This is a partial success, but I hope to have the third one planted shortly. It will be partial cheating because it will be in a pot on the porch, but it will still make the area look nice. We are edging our way towards complete.
6. Visit the sculpture gardenand the Art Festival with Byron. Uh, I went to the art festival. With my sister. I had such high hopes of finding a little piece to actually purchase, maybe for the baby, and was really disappointed. I couldn't find anything under $100, and even those prints were at least 8x10 if not 11x14 or larger. So it was a little disappointing but still fun. And I totally skipped the sculpture garden, so I can't check it off my list just yet.
7. Read 50 pages in "Through Painted Deserts" (I try to be a reader, really I do!) Woo hoo! This is a big fat complete. In fact, I actually read 66 pages. To you readers, this is abysmal, but for me this is definite progress. Keep it up, Katie!
8. Make a clothing drop at Goodwill. Done. Technically this happened last night, but it is so close I'm just going to count it. The trunk of my car thanks me for getting this done, too.
9. Find a pretty pillow case to use at the hospital. Failed. I looked a few times, but I didn't find anything perfect. I suppose I'll have to intensify my search if I really want this.
Overall I think I did so-so on my goals for June. I didn't complete everything, but I did get some good things done that have been hanging over my head for awhile, so that feels great. As for July, my goals are going to be a little less aggressive, since there is one major goal topping the list. Here they are.
1. Have a baby.
2. Read 50 pages in "Through Painted Deserts".
3. Go on 15 walks (despite having swollen feet and ankles - walking can help with labor!)
4. Finish cutting out quilt pieces.
5. Finish thank you notes (I had 4 showers last month!)
And although I could keep going, I think I'm going to cut it short there. I expect that goal #1 is going to take much of my time this month, since once I complete it, I am only actually beginning the work! Good luck to any of you who have monthly goals. May we all be prosperous!
1. Take the dog (and myself) on at least 15 walks. This didn't go so well. I think I only went on 6 or 7 walks. I know this isn't a place for excuses, but I had a little trouble in this area. You see, my feet have swollen into small tree trunks. I have actual fat rolls on my cankles. By the time I get home from work, my feet are so sore and I just can't bring myself to walk a mile around the neighborhood. I have high hopes for other goals of this type as soon as the swelling is gone.
2. Hem the bedroom curtains. I did not do this. No excuse.
4. Line the nursery dresser drawers with fun paper. Couldn't find any fun paper. Anywhere. I'll keep looking.
6. Visit the sculpture garden
9. Find a pretty pillow case to use at the hospital. Failed. I looked a few times, but I didn't find anything perfect. I suppose I'll have to intensify my search if I really want this.
Overall I think I did so-so on my goals for June. I didn't complete everything, but I did get some good things done that have been hanging over my head for awhile, so that feels great. As for July, my goals are going to be a little less aggressive, since there is one major goal topping the list. Here they are.
1. Have a baby.
2. Read 50 pages in "Through Painted Deserts".
3. Go on 15 walks (despite having swollen feet and ankles - walking can help with labor!)
4. Finish cutting out quilt pieces.
5. Finish thank you notes (I had 4 showers last month!)
And although I could keep going, I think I'm going to cut it short there. I expect that goal #1 is going to take much of my time this month, since once I complete it, I am only actually beginning the work! Good luck to any of you who have monthly goals. May we all be prosperous!
Subscribe to:
Posts (Atom)