I'm having a hard time sitting down to write the next piece of my quilt story. So when is a better time than when I have stacks and stacks of work to do in front of me that I am avoiding? Yeah, that's what I thought. Now'll do.
So if you can remember where we were last, I had just finished the quilt top and now it was time to start quilting. Ummm...any ideas? I kind of had an idea of what I wanted to do based on a tutorial I found here and a quilt here. Then I dove in. I made a quilt sandwich, first laying the backing fabric down on my dining room table, then the quilt batting, then the quilt top.
I started with a handful of safety pins in the center of the quilt, and I just started pinning. I pinned in a swirling pattern and smoothed, smoothed, smoothed as I went. Here it is with just a few pins...
And now here it is with just a few more...
A note to anyone who wants to follow my process. Although I pinned from the center out, I quilted from one side to the other. I found that there were several times when I had a little bit of excess "pouf" going on. To correct this, I just re-smoothed and re-pinned. If I were doing this again, I might consider pinning from one side to the next as well, and honestly, maybe even pin as I quilt. But enough about pinning.
Next I had to figure out a way to quilt a baby quilt in my little old machine. I knew that I wanted this quilted with random horizontal and vertical lines, and some of them in groups of two or three. That's not a terribly hard pattern and I felt like I had a pretty good vision of what I wanted. The first couple of rows were easy-peasy.
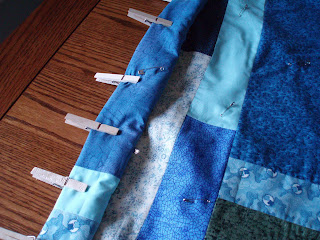
The middle section was a little bit trickier. Enter MacGuyver.
I don't know if clothespins are an official sewing notion, but they worked for me. I just rolled up the quilt as I went, and for sewing, I just lined up my presser foot with one of my seams so that my sewing lines were straight. I must have gotten tired at this point and I didn't get any more pictures, but there was one other sewing notion that I used. It was blue painter's tape. There were some places that I wanted to quilt that weren't close enough to a seam, so I used the painter's tape (ball-eying it again) and created my own reference point. It worked really well.
That was really my first experience quilting, well, anything, and I'm happy with my results. The only thing I had left to do was to bind the quilt, which I will share soon in part 3.


No comments:
Post a Comment