Thursday, March 31, 2011

Just a Little Something I Whipped Up

Friends of ours are having a baby girl next month, and although I have already attended two showers for them, I couldn't resist making one more gift.  I have fabric stashed in all corners of this house, and occasionally if I am cleaning something or looking for something, I stumble across some that I had forgotten about.  In one of these missions, I found a little bit of flannel that I had gotten for some baby gifts I made a few years ago, and happened to have just enough left for one more quick project.  So despite all the other things I had going on, I dove right in.
For awhile, this was my go to baby shower gift - the Birdie the Cat free pattern from Amy Butler.  I've added special stitching in the past, but for this one I went with the quick and dirty approach.  I used fusible webbing for the face, sewed the body together, stuffed it full of stuffing, and hand sewed the opening closed.  It probably took an hour altogether, but here is the cute little guy I ended up with.
Best part is it was free since I already had all the materials on hand.  That is seriously a first, I think!

Monday, March 28, 2011

Purge #3

This purge comes to us in two parts, and boy, let me tell you, it's getting harder.  I thought I would be able to come up with 100 items no problem, but here we are less than two weeks away from my deadline and I'm not only about 75% there.  So I'll show you what I have come up with to get rid of now, and I'll need to be relentless in the next few weeks as I find my last few items.  If you suddenly flash to an episode of hoarders in your mind, well, we probably aren't that far from the truth.
Here is the breakdown of what you see, part 1:
  • 4 gift bags
  • 1 old Christmas ornament
  • 1 half burned candle
  • 1 small decorative bag
  • 1 decorated tin (an old craft project)
  • the letter K (another old craft project)
  • 1 old scrunchie that is probably from middle school
  • 5 things of old makeup found in the bottom of the bathroom drawer (ick)
  • 1 old candle plate, waxy mess included
  • 1 pair of winter gloves
17 more items, bringing the running total to 66.  Oh but wait, I found a few more, so here now is part 2.
And now, what you are looking at in part 2:
  • 1 (more) gift bag - these things just multiply!
  • 3 gift boxes
  • 1 lunch bag
  • 1 teapot
  • 1 painting hat (why?)
  • 1 massive collection of a zillion paint samples (counting as one item)
  • 1 massive collection of a zillion Broadway show playbills (also counting as one item)
I have a couple of notes that I feel I must share.  First, the teapot is in perfectly good condition.  I thought that when I got married I had to have one.  I forgot about the fact that I hate tea.  That is getting donated to Goodwill.  Second, the paint samples.  Did I think I was collecting my own little paint chip library?  Yes.  Did I think I had that many rooms to paint?  Maybe.  Was it hard to trash it?  Yes.  But somehow I manage.  And third, the playbills.  I am a huge musical fan and am extremely grateful for the amazing shows I've been able to see, but I no longer feel the need to keep them all as a souvenir of my experience.  Especially now as I am preparing for baby, I feel differently about the things that used to consume my free time in the past.  Hopefully, even though this was a little hard for me, it will be cathartic.  I have new experiences to look forward to ahead of me, and I want to carve out time and space in my life for those.  I feel better now.  Hopefully you will forgive me and my hoarding tendencies.  Altogether now we are at 75 items after three purges.  Math alone would lead me to believe that this is achievable, but I'm still scared.  I'll just keep repeating it to myself...be relentless...be relentless...
Purge #1
Purge #2

Sunday, March 27, 2011

Tutorial: Alphabet Blocks

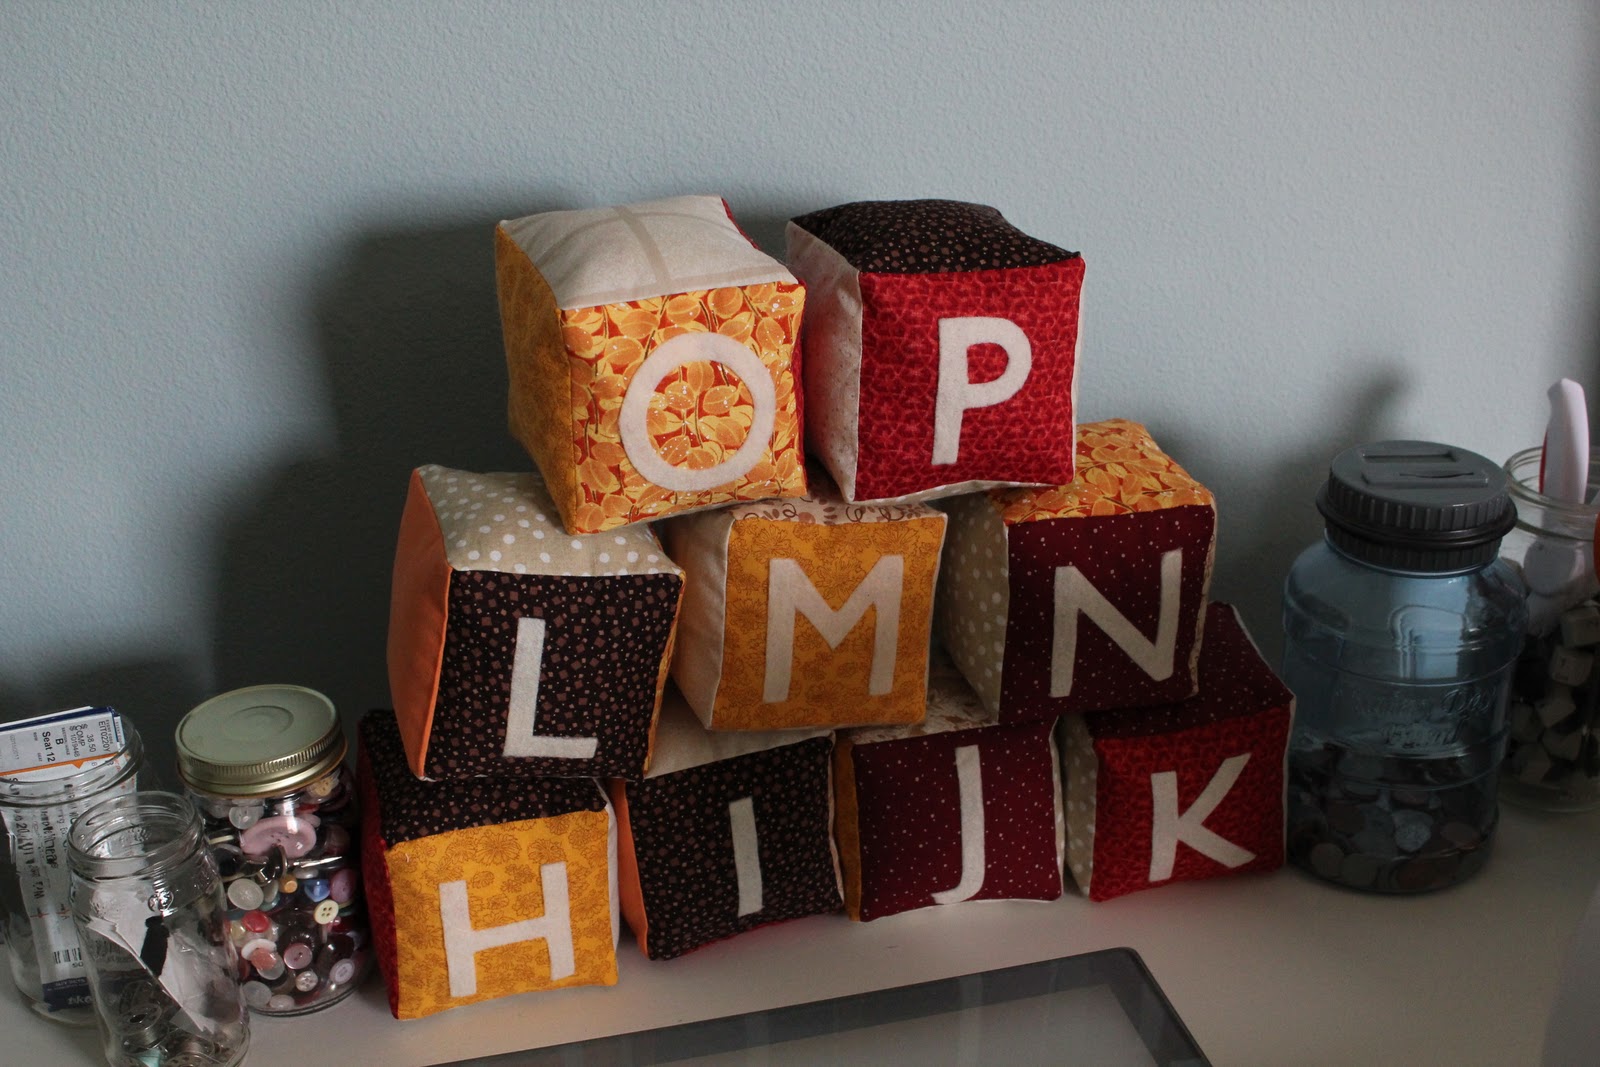
This could be a really long post, filled with tons of pictures, but I hope that in the end I can break down the process so that you can repeat this project.
1.  Cut out squares.  If you are doing the entire alphabet, you will need to cut out at least 156 squares.  I say at least, because I went for a random pattern and used up fabric from my stash, I needed a few more squares so I didn't have repeats.  The squares are 4" x 4", but you can size them however you want.
2.  Cut out the letters.  I used felt, so that I wouldn't have to treat the edges, and I affixed fusible interfacing to the back of the felt prior to cutting out the letters.  I printed out the letters on my computer.  You could use just about any font, but I would definitely recommend something simple.
3.  Iron on the letters.  Don't forget to peel the paper backing off the fusible interfacing.  I may have done that the first time I used it.
4.  Sew the four squares together that will make up the sides.  When you do this, leave a 1/4" seam allowance (or just smaller).  Also, leave a 1/4" gap of unsewn material at each end of the seam.  This will make it easier when it comes to turning corners when sewing on the top and the bottom.  Remember to iron open all your seams.
5.  Pin on the top.  I used two pins per side, and I angled the direction of the pin toward the center of the square, again, making the corners easier.  I started with the top piece so that the hand sewn seam would end up on the bottom.  That is not a requirement, but in my opinion, it makes it look nicer.  Sew all around the top, leaving a 1/4" seam, and overlapping your starting and stopping points.  I also like to remove the pins as I go instead of trying to sew over them.  That is up to you.
This is a close up of how I did the corners.  If possible, I tried to stop exactly between the folds, then pivot the whole thing.  Most of the time I just got as close as I could.
6.  Pin on the bottom, just like the top, and sew.  The difference here is that you will leave an opening so that you can turn the block, stuff it, and hand sew it closed.  The opening should be about an inch wide.
7.  Turn the block inside out through the opening.
8.  Push out the corners.  I just used my fingers.
9.  Fill the block with stuffing, then hand sew it closed.  And...done!
Repeat this process 25 more times.  This is where I am going to share a couple of personal thoughts.  The entire alphabet, when you are as busy as I am, is a big undertaking.  That is why it took me several months to complete.  If you have tons of time, are more dedicated than me, have no time table, etc., then this is a great project for you.  If you don't, I might suggest choosing a word, like a baby's name.  It will take you way less time.  However, in the spirit of not wanting to be totally negative, I also want to say I am really proud of myself for doing this project without instructions, and I am extremely pleased with the outcome.  I'm sure there may be similar projects out there, but I didn't reference them.  And in the end, I think it is a really cute gift.  And the blocks will be PERFECT for throwing, especially for those out of control baby hands.  I think I am even crazy enough to try another set for myself.

Saturday, March 26, 2011

Alphabet Blocks, Part 2

Remember these?  These were the alphabet blocks that I started last summer for a baby shower gift.  And then the gift turned out to be A-B-C-D-E-F-G.
Meanwhile, the baby was born in September and is now several months old.  And I haven't come back to them in, well, several months.  Until now.  I've sewn up H through V so far, which means only four letters to go.  I unfortunately ran out of stuffing, so I'll have to pick some up and then of course, hand sew them shut, but still - I can now see the light at the end of the tunnel with this project.  And then I can move on to others, like checking off items on my 30 before 30 list.
Oh, and guess what else...I'm even coming back with a tutorial for how I made them.

Wednesday, March 23, 2011

Tightrope

A mere 9 days after I posted my paint swatches for the nursery, I have...drumroll please...made a decision.  The winner is...
The color is called 'Tightrope' and it's the middle one in the swatch.  I grabbed the sample from Lowe's and I think it is by Olympic, although we might have to color match to something no-VOC. In the words of a coworker, "It took you that long to choose beige?"  Uh, yes.  But there's a little more to the story than that.  I actually bought some fabric for the room as well (can you believe it???), so I was trying to match the undertones.
Ironically, these two fabrics match the current color of the room, but I still feel like painting just to make it different from the rest of the house.  One of these fabrics will become the drapes, and I plan on using the other for the crib skirt, but I haven't decided which will be which, yet.  I am still looking for more fabrics to use for other DIY elements, and I'm thinking that I will probably accent with pops of red.  I also am really liking the trim detail in this nursery from my favorite show ever Sarah's House, but our ceilings aren't as high as these so I don't know if it would have the same effect.
I am still mulling that one over.  Now that I've made up my mind on paint though, I'm really itching to get started on it.  I have heard that blue is a really hard color to cover so I think we are going to start out with primer.  If all goes well, we will attack that on Saturday.  And by we, I mean my loving husband of course.  He did say that he would do anything I wanted!  He may regret that, but he did say it.
When we get the painting done, the next project I have in mind for the room is to refinish a dresser/changing table.  When my grandmother passed away, I inherited all of my mom's furniture from when she was a girl, and I've been saving it to use for my children.  I just want to update the color and the hardware.  The dresser is currently painted a pea soupy green color but the top is wood (probably a veneer or laminate or something), so I'm thinking leaving the wood top and painting the whole thing plain white.  As for other projects, I don't have a running list per se, but I am keeping my eyes keenly peeled for ideas.  Sensing that I am in the midst of an energy spike, I'm trying to take advantage of that and get as much done now as I can, before third trimester exhaustion sets in!

Saturday, March 19, 2011

A Place for Everything

In our house, the way it was built, there wasn't an immediate way for me to see myself head to toe before I left the house.  On top of that, the bathroom counter in the master bedroom is extra high, so my usual approach of checking out the bottom half by standing on the counter was a little more dangerous than before, not to mention lacked headroom. So the easy fix was to pick up one of those cheap-o $5 full length mirrors from Target.  Which is exactly what we did.  And what we did with that mirror once we got it was...nothing.  Well, actually we moved it from room to room, leaning it up against various walls, hiding it behind various doors, etc.  For months.  This was bad, because our cheap-o mirror was starting to warp from the care we had given it.  So continuing my motivation that comes from my mother's haunting words, I finally found a place for it to make permanent residence - the back side of my closet door (which is actually in our master bathroom).
All it took was command adhesive strips.  Super easy.  I picked up a package of the 5 pound strips, and yes, I used all 6 in the package, but I would be willing to bet that was overkill.  I just didn't have anything better to do with the remaining strips so I just stuck them on for good measure.  And just like that, our nomadic mirror has a new home.  And now I'm happy.
One additional note, I didn't measure when doing this project, or ask for help from anyone.  I did what my mom and I call "ball-eyed" and the rest of the world calls "eye-balled" it.  And it's crooked.  But I'm just going to look past that, and if it bugs me in the end I'll splurge for new adhesive.

Monday, March 14, 2011

So Many Options

I went to Lowe's the other day to pick up a couple of paint swatches.  This is what I ended up with:
There's only about 50 swatches up there in really about two colors.  I'm feeling the creams and the pale olives.  Where is that coming from?  Ummm...my addiction to Sarah's House.  And did I find any fabrics that coordinate with these colors?  Ummm...no.  So apparently what I haven't learned from Sarah's House is to start with the fabric scheme and choose the fabrics from that.  No, I haven't learned anything at all.  I've only confirmed the fact that I am ridiculously indecisive.
Somewhere right in the middle there is my favorite color - Olive White.  It looks neutral in some lights and green in other, and I don't really know why I'm drawn to it, but I am.  I am caught between the idea of creating a color palette (aka playing designer) with fabric first, then building the room from there, or just winging it based on things I like, because in reality, I'm not a designer, but just a regular person.  I'm interested in making quick and frugal decisions, so I think my next step is another trip to the fabric store.  If I end up with no luck there, then I may just commit to the "wing it" plan.

Saturday, March 12, 2011

Homemade Laundry Soap

This past week, I was having a conversation with my mom when she said, "I really hate it when people buy things and then don't use them."
The thought that ran through my head was "Guilty."  I never mean to do this, I just get so many ideas and lack the time or energy for follow through.  So I felt a little convicted, and something popped into my mind that I new I needed to tackle.  A while back, I had made a batch of homemade laundry soap.  It was awesome, and both Byron and I loved it. Once we went through the first batch, some time later I bought more ingredients to make more.  And then they sat on the shelf.  For months.  Until now.
So today, when I woke up bright eyed at 5:45 am (does this happen to anyone else?), I knew it would be a great time to quickly make another batch.  It only took about a half hour it was so easy.   And now, I will share it with you.
I got the recipe from a woman from my hometown.  I don't know where she got it, but as far as I'm concerned, the credit is all hers.  Here are the ingredients:

  • 1 Fels-Naptha bar
  • 1/2 cup Borax
  • 1/2 cup Arm & Hammer Washing Soda
Don't those ingredients make you feel like you walked into the 1950s?  Yeah, I had never heard of some of them.  In fact, I couldn't find the washing soda in my entire city, so I had to resort to the small town my parents live to find it.  Anyway, you start with the Fels-Naptha bar.  The directions say to chop it up into little pieces and then put it in the food processor.  What works for me is to just drag out my cheese grater and go to town.  Ironically, I don't use my cheese grater for cheese that often, but the majority of the time I actually use it for non-food projects.

I guess you can't really see in the bowl, but it basically looks like grated soap.  With a couple pieces of grated skin mixed in there.  No matter how careful I try to be, I always catch a finger somehow.
Once you have that done, you just add the Borax and the washing soda and mix well.
Since I had the Borax and washing soda from a previous batch, it got a little lumpy.  I tried to break up the lumps as much as possible.  If you use fresh, you shouldn't have that problem.  Store the soap in a covered container.  It's really as easy as that.  And the best thing is, it only takes about 2 tablespoons per load, so even though it doesn't look like much, it lasts quite awhile.  I do still have enough ingredients on hand to make two more loads, so I still have a little bit of that guilty conscience (thanks mom), but I feel better that I have one less project hanging over my head...until my next great idea strikes!